We all know that tanning under the sun is bad for our skin and our health. Getting a real tan from UV exposure is a terrible idea since it contributes to wrinkles, large pores, ages spots, skin cancer, etc. However, you can still get a gorgeous glow the safe way.
Self tanning products are getting more popular each day. These products come in a wide range. In order to help you make a good choice, we are going to discuss them in detail, as well as the proper ways to apply them.
Different Types of Self-Tanning Products
Self-Tanning Lotion
There is a huge selection of self tanning lotions available on the market that you can choose from. Lotions are oldies but goldies. They’re some of the easiest products to apply and they have a very hydrating formula as well. The only thing that you might find disturbing is that they may take a bit longer to dry, about 15-20 minutes.
Self tanning lotions are the format for most gradual self-tanners. They deposit less colour but are used on a daily basis to build a deeper shade. Plus, gradual tanners are the easiest to correct.
Self-Tanning Mousse
Mousses are a lightweight, foaming formula that delivers a gradual, long-lasting tan. Tanning mousses are best applied with a tanning mitt to allow for even colour application and they usually dry quite quickly (about 5 minutes).
Self-Tanning Bronzer
In fact, bronzers are not the same thing as self-tanners. The colour of this product shows up instantly and it washes off. So, if you are in a hurry and you want full colour right at the moment, bronzers are the thing to go for.
Water Spray and Mists
You can achieve your best glow by spritzing as well. A pump or aerosol spray is most similar to a professional spray tan and it consumes the least time to apply. This liquid formula is applied by misting it onto your skin and blending it in with a mitt by using sweeping motions. Sprays and mists usually dry in just a minute or two.
How Do I Prepare My Skin for Self Tanner?
If you plan to shave or wax, make sure that you do it 24 hours or more before applying the self-tanning product. Any closer to the time you do it, the tanner can more easily settle into your hair follicles, thus creating teeny tiny dots.
It’s also highly recommended to exfoliate. The ingredient that, in fact, darkens your skin is the DHA and it interacts with the amino acids that are present in the outermost layers of your skin. However, there is commonly some buildup of skin cells, usually on the elbows, knees and feet, and the “tan” here can be too intense. So, either do a chemical exfoliation with an AHA or a mechanical exfoliation with a scrub.
Now, you’ll probably want to put on a moisturizer after the shower. Yes, using a body moisturizer is important for your skin, but when preparing for a self-tanning session, additional moisturizers are not recommended. They will dilute the strength of the self-tanner and delay your tan’s arrival. The only place where you can apply moisturizer is to your elbows, knees, hands, and feet as these areas will always be drier than the others. The moisturizers in those areas will act as a barrier to ensure that the tan comes out even.
After the shower, make sure that your skin is completely dry before you apply the self tanner. Give your skin about 10 post-towel-off minutes before you start the process.
What Is the Best Way to Apply Fake Tan?
Use enough product so that it glides effortlessly over your skin. Don’t be afraid to use the product and try to tan a large area.
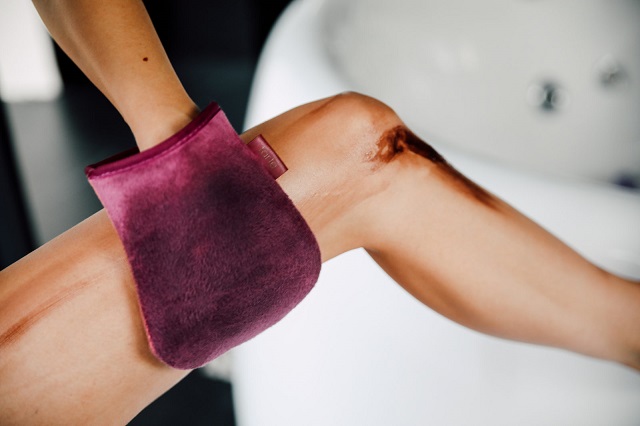
Many self tanning lotions come with a mitt. However, if the one you bought doesn’t have one, it’s worth the investment, so look for one at a well-stocked beauty cosmetics shop. To use this mitt, you just slip your hand into the flocked fabric mitt that smoothes and blends the product as you apply it. If you fear that you may have applied too much tanner, use the fabric side of the mitt to buff out any areas where you may have overdone it.
Start with the face. Your face is the only place where hands trump mitt. To smooth on the product, use your digits. Make sure that you don’t get the product in your eyes, mouth, or nose. Immediately wash your hands with soap and water after applying tanner to your face.
Then, using sweeping motions, work your way up and over your knees and thighs to your torso. Then, arms, armpits and the sides of your torso come next. Leave the feet and the hands for the end. If you want to drop a few pounds, you can also try contouring.
Your tan will take up about 6-8 hours for the colour to fully develop. It’s not recommended to get wet in any way (getting sweat, swimming, splashing, showering) at least 4 hours after applying the tanning lotion. Of course, you can wash your hands, just don’t let the water run down your arm.